How to Make Living Room Curtains Look Expensive: Simple Designer Upgrades
Your living room curtains can shape how the whole space feels. Like rugs and wall color, the right choice can tie the room together. You do not need high prices to get a polished look. Small design choices can help your curtains look more refined without extra cost.
Comfort matters in a living room, and texture plays a big role. Curtains work with your sofa and rug to add warmth and balance. When you choose fabrics, finishes, and simple accessories with care, you can lift the look of your windows and the room around them.
How to Make Living Room Curtains Look Expensive
1. Pick High-Quality Fabrics and Finishes
Start with fabric choice because it shapes the entire look. You get a richer feel when you choose dense, soft materials that hang well.
Velvet, faux velvet, linen, and silk blends work best. These fabrics reflect light in a calm way and hold their shape. They also create deeper folds, which makes windows look finished and planned.
Color matters as much as fabric. Deep neutrals, warm earth tones, and darker shades tend to look more refined than bright or pastel colors. Simple designs often look better than busy prints.
Fabric guide
| Fabric type | Why it looks expensive |
|---|---|
| Velvet | Thick, soft, and smooth drape |
| Faux velvet | Similar look at lower cost |
| Linen | Natural texture and soft flow |
| Silk blends | Subtle shine and light weight |
Keep patterns limited. If you use one, choose a small or woven design instead of a bold print.
2. Use Lining for Weight and Shape
Add lining if you want curtains to look fuller. Lined curtains hold their form and fall in cleaner lines.
Lining also blocks light and helps with warmth. That added function supports a higher-end look because the curtains feel more solid.
You can choose standard lining or blackout lining. Both give extra body to the fabric. Even thin curtains look better once you add this layer.
If you already own curtains, ask a local tailor to add lining. This change often costs less than replacing the panels.
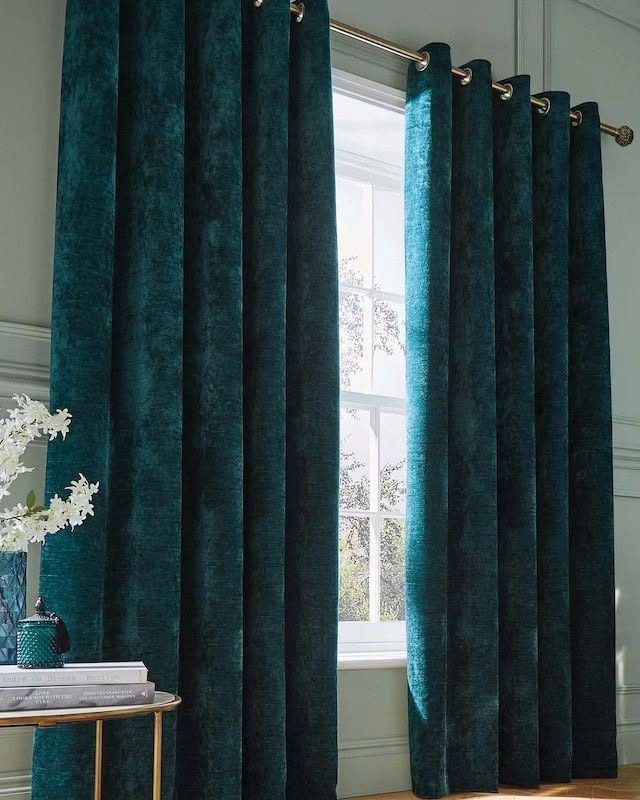
3. Upgrade the Rod and Hardware
Curtain hardware often gets ignored, but it matters. A strong rod supports the fabric and frames the window.
Metal finishes like brass, matte black, bronze, and brushed nickel work well. Dark wood rods can also look rich if they match your room.
Choose a rod that extends past the window frame. This lets you pull curtains fully aside and shows more glass.
Details count here. Finials, rings, and brackets should match the rod and feel solid, not thin or shiny plastic.
Rod tips
- Pick a rod thicker than one inch
- Match the finish to other metals in the room
- Mount it higher than the window frame
4. Add Sheer Panels for Light and Depth
Sheer curtains create a soft and layered look. You can hang them alone or pair them with heavier panels.
Light fabrics let daylight in while keeping privacy. This balance helps the room feel open and calm.
Natural sheers, like voile or linen blends, work best. They move gently and do not look stiff.
If your current curtains feel flat, add sheers behind them. This adds depth without replacing anything.
Avoid stiff synthetic sheers. They can look flat and do not drape well.
5. Choose Refined Header Styles
The header controls how the fabric folds at the top. This small detail changes the entire look.
Pleated headers create classic structure. They suit both modern and traditional rooms.
Wave headers give a smooth, even flow. They work well in clean and simple spaces and feel hotel-like.
Pencil pleats can also look good if the fabric is thick and well lined. Avoid thin fabrics with this style.
Header styles and effects
- Pinch pleat: Formal and balanced
- Wave: Clean and modern
- Pencil pleat: Flexible and soft
Choose the style that matches your room design and curtain weight.

6. Hang Curtains at the Right Length
Length plays a big role in how expensive curtains look. Short panels break the line of the room and feel unfinished.
Floor-length curtains work best. You have two main options based on the style you want.
Pooling panels extend a few inches onto the floor. This creates a soft, decorative look when curtains stay open.
Grazing panels stop just above the floor. This gives a clean and neat finish that suits modern spaces.
Always measure from the rod, not the window frame. This helps you get the correct length.
Style Ideas to Complete the Look
Small choices bring the whole setup together. These items work well when paired with the tips above.
- Linen-look sheer panels in soft neutral tones
- Extendable metal rod with a warm wood or brass finish
- Lined velvet curtains in deep, muted colors
- Pleated or wave header panels for even folds
- Matching rings and finials for a complete set
Keep the look simple and balanced. Focus on fit, weight, and finish rather than trends.
Each change builds on the next. Together, they help your living room curtains feel calm, finished, and well chosen.
How can I make my plain living room curtains more interesting?
You can keep simple curtains and still give them more style with small changes. Focus on texture, shape, and details rather than bold prints.
- Add tiebacks or holdbacks. Choose fabric, rope, wood, or metal. These details draw the eye and change how the curtains fall.
- Layer with sheer panels. Hang light, textured sheers behind your main curtains. This adds depth and softens the window.
- Upgrade the header. Use pleats, rings, or a tailored top edge to give the curtains a cleaner look.
- Sew on trim. Add narrow borders, tassels, or fabric bands along the sides or bottom for subtle contrast.
- Improve the hardware. Swap basic rods for metal or wood finishes that match your room.
Quick ideas and effects
| Change | Visual effect |
|---|---|
| Sheer layer | Light and depth |
| Decorative trim | Texture and detail |
| New rod | More polished look |
These updates keep your curtains calm while making them stand out.
How do you hang living room curtains to look fancy?
You get a polished look when you focus on height and width, not just fabric. Hang the rod close to the ceiling to draw the eye up and make the room feel taller.
Place the rod wider than the window frame. This lets the panels stack off the glass and brings in more light.
Key placement tips:
- Mount the rod 6–12 inches above the window.
- Extend the rod 8–12 inches past each side.
- Let panels touch the floor or skim it.
Choose a solid rod with simple finials. Avoid short panels or thin hardware, which can make the space look unfinished.